Hosting A Secure Static Website with Custom Domain on AWS using Infrastructure as Code and CI/CD Pipeline

Photo by Joshua Aragon on Unsplash
Introduction
Recently when I was checking on doing AWS Hands-on projects, I came across Cloud Resume Challenge - AWS by "Forrest Brazeal". Considering the number of services being touched upon by this project I decided to work on building the same.
Project Requirements
Project requirements are as follows. Detailed requirements can be seen here at link
Hosting your Resume as Static Website**(using S3 bucket)** and can be designed using HTML, CSS, Javascript.
Your Website should be using HTTPS**(using ACM and CloudFront)** for security and using Custom Domain**(using Route53)**.
For Infrastructure as Code(IaC), provisioning the above application stack using CloudFormation template and deploying using AWS CLI
For CI/CD implementation of above application stack, using AWS CodePipeline
Also your Website should be displaying the Website Visitor count. For this you can store the count in DynamoDB Table and make request from Javascript code to DynamoDB via by API Gateway and Lambda (i.e using Serverless stack)
For IaC, provisioning the Serverless stack using Serverless Application Model(SAM) template and deploying using SAM CLI
For CI/CD implementation of Serverless stack, using SAM Pipeline through a) GitHub Actions OR b) AWS CodePipeline
Architecture Diagram
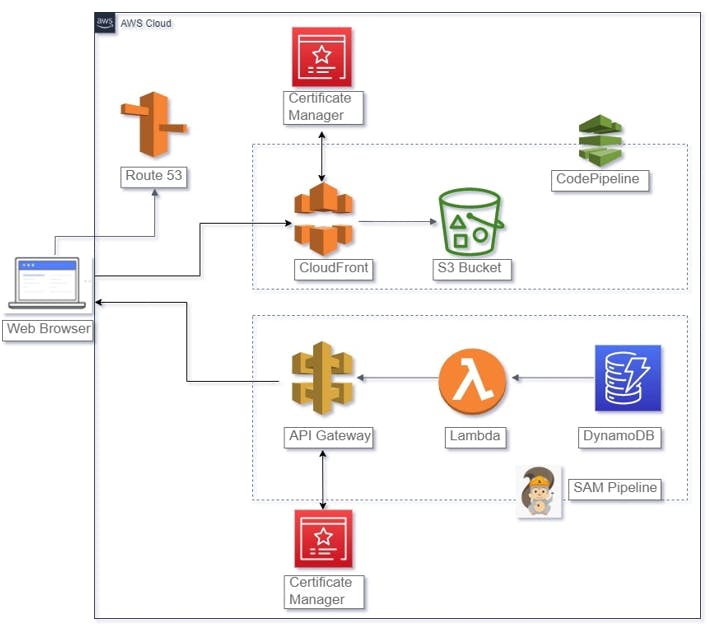
Approach Taken
As the ask is to provision the application as IaC and deploy using CI/CD Pipeline, I have categorized the application into following:
1) Stack1 - Hosting Secure Static Website in S3, accessed through CDN with Custom Domain name
Create Application stack consisting of Route53 RecordSet, CloudFront Distribution and S3 Bucket
Deploy using AWS CodePipeline with Source as AWS CodeCommit and Deploy Action provider as CloudFormation
2) Stack2 - Deploying Serverless stack
Create Application stack consisting of "API Gateway" API, Lambda function, DynamoDB Table
Deploy using AWS SAM Pipeline using GitHub Actions OR AWS CodePipeline
**3) Stack3 **
Create Application stack consisting of S3 bucket for pushing file(HTML, CSS, Javascript, Images etc) changes into S3 bucket
Deploy using AWS CodePipeline with Source as AWS CodeCommit and Deploy Action provider as S3Bucket
4) Displaying the VisitorCount on the WebPage
Here the ask is any time any user visits the Website, it should display the current Visitor Count. This has been implemented using the Serverless stack(API Gateway, Lambda, DynamoDB)
5) Designing the Website using HTML, CSS, Javascript
References Used
Needless to say AWS has a very comprehensive documentation, so have referred the same during my implementation
Implementation
Start with requesting for below in AWS Console:
**1) Register Domain in Route53: **
If you already don't have your own domain, you can register the same in Route53.
Once request completed, a corresponding Hosted Zone is automatically created having NS and SOA records
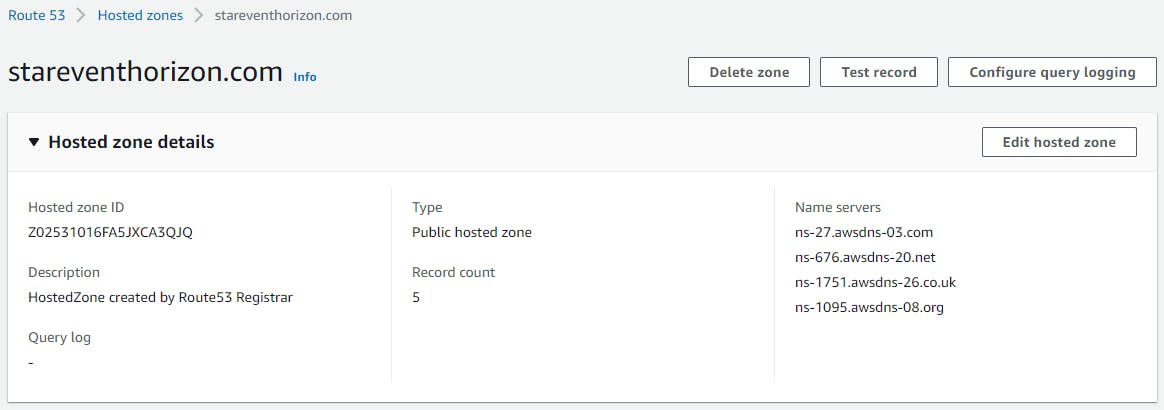
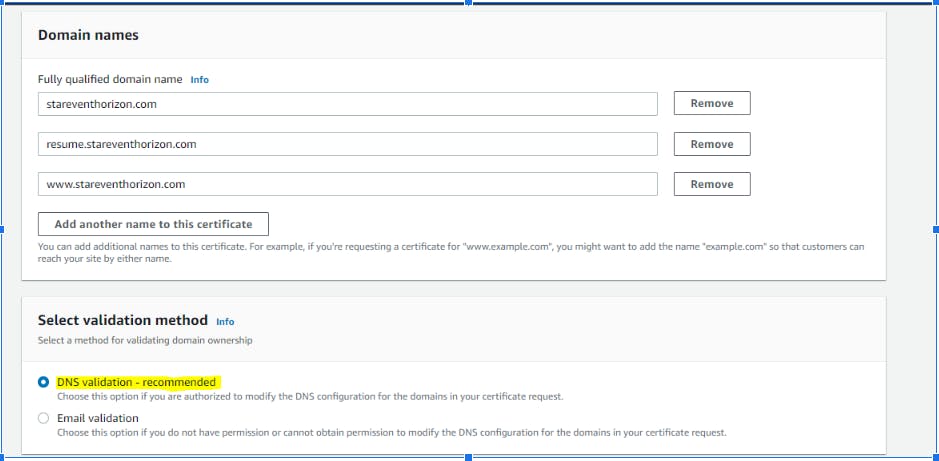
**2) Request for Public Certificate in AWS Certificate Manager(ACM): **
While requesting certificate you can add additional names to your certificate. For Validation method, select DNS validation.
Once the request is submitted, it will go into Pending Verification status. Choose option to “Create above CNAME records in Route 53”
CNAME entries gets added in Route53 for each Alternate name you had given while creating the certificate.
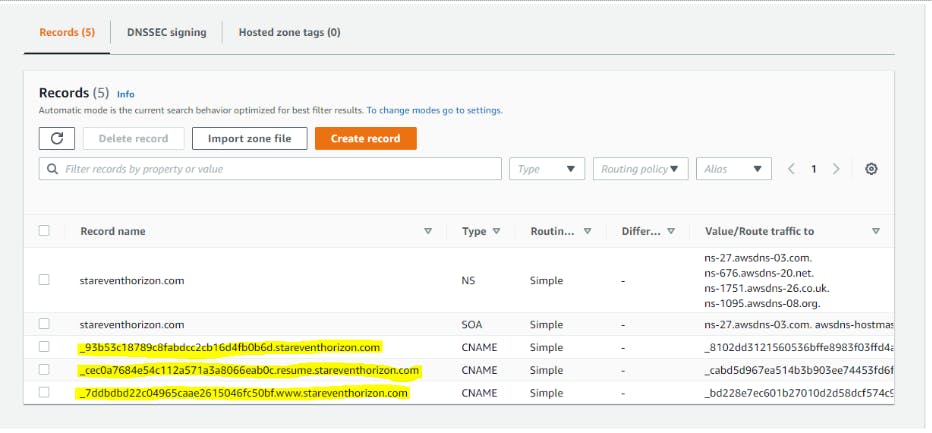
Post this it took 15-20 min for me to get the certificate issued.
3) Next is Application Stack Creation
For the Application stack, first I created the individual components using AWS Console to get idea about the different configurations, so later it was helpful when provisioning the same using CloudFormation Templates.
3A) Stack1 - Hosting Secure Static Website in S3, accessed through CDN with Custom Domain name
- **Create the Application stack CloudFormation Templates: **
Here we create resources: S3 bucket, S3 bucket policies with CloudFront Origin Access Identity(OAI) enabled, CloudFront Distribution with S3 bucket as Origin+Default Cache behaviour+Certificate to be used for HTTPS connection, Route53 RecordSet, CloudFront Origin Access Identity
NOTE: Using AWS guideat link, you can get details of all the configurations needed for individual resources and then make changes based on your requirements.
Parameters:
  ACMCertARN:
    Description: ACM CloudFront Certificate ARN
    Type: String

  RootDomainName:
    Description: Domain name for your website
    Type: String

  CDNAltDomainName:                             #Alternate domain name for CloudFront
    Description: Alternate domain name for CloudFront
    Type: String

  CDNHostedZoneID:
    Description: Route 53 Hosted Zone ID for CloudFront
    Type: String
    Default: Z2FDTNDATAQYW2

  S3BucketName:
    Type: String
    Default: myresume-staticwebsite

Resources:
  S3Bucket:
    Type: AWS::S3::Bucket
    Properties:
      BucketName: !Ref S3BucketName
      AccessControl: Private
      WebsiteConfiguration:
        IndexDocument: index.html
        ErrorDocument: error.html
      Tags:
      - Key: "CreatedBy"
        Value: "Prams"

  BucketPolicy:
    Type: 'AWS::S3::BucketPolicy'
    Properties:
      Bucket: !Ref S3Bucket
      PolicyDocument:
        Id: MyPolicy
        Version: 2012-10-17
        Statement:
          - Sid: PublicReadForGetBucketObjects
            Effect: Allow
            Principal:
              AWS: !Sub "arn:aws:iam::cloudfront:user/CloudFront Origin Access Identity ${CloudFrontOriginAccessIdentity}"
            Action: 's3:GetObject'
            Resource: !Join
              - ''
              - - 'arn:aws:s3:::'
                - !Ref S3Bucket
                - /*

  MyDistribution:
    Type: AWS::CloudFront::Distribution
    Properties:
      Tags:
      - Key: "CreatedBy"
        Value: "Prams"
      DistributionConfig:
        Aliases:
        - !Ref CDNAltDomainName
        CustomErrorResponses:
          - ErrorCachingMinTTL: 10    #The minimum amount of time in seconds
            ErrorCode: 404
            ResponseCode: 404
            ResponsePagePath: '/error.html'
        Origins:
        - DomainName: !GetAtt S3Bucket.RegionalDomainName
          Id: myS3Origin
          S3OriginConfig:
            OriginAccessIdentity: !Sub "origin-access-identity/cloudfront/${CloudFrontOriginAccessIdentity}"
        Enabled: 'true'
        Comment: !Sub "CloudFront Distribution for ${S3BucketName}"
        DefaultRootObject: index.html
        DefaultCacheBehavior:
          AllowedMethods:
          - GET
          - HEAD
          - OPTIONS
          CachedMethods:
          - GET
          - HEAD
          - OPTIONS
          Compress: true
          CachePolicyId: 658327ea-f89d-4fab-a63d-7e88639e58f6     #Refer using-managed-cache-policies.html
          TargetOriginId: myS3Origin
          ViewerProtocolPolicy: redirect-to-https
        PriceClass: PriceClass_100
        ViewerCertificate:
          AcmCertificateArn: !Ref ACMCertARN
          MinimumProtocolVersion: TLSv1.2_2021
          SslSupportMethod: sni-only

  MyDNS:
    Type: AWS::Route53::RecordSetGroup
    Properties:
      HostedZoneName: !Sub
          - ${Domain}.
          - Domain: !Ref RootDomainName
      Comment: Zone apex alias.
      RecordSets:
      - Name: !Ref CDNAltDomainName
        Type: A
        AliasTarget:
          HostedZoneId: !Ref CDNHostedZoneID
          DNSName: !GetAtt MyDistribution.DomainName

  CloudFrontOriginAccessIdentity:
    Type: AWS::CloudFront::CloudFrontOriginAccessIdentity
    Properties:
      CloudFrontOriginAccessIdentityConfig:
        Comment: !Sub "MyDistribution OAI for ${S3BucketName}"

Outputs:
  WebsiteURL:
    Description: 'Website URL'
    Value: !Ref CDNAltDomainName

  DistributionId:
    Description: 'CloudFront Distribution ID'
    Value: !Ref MyDistribution

  Domain:
    Description: 'Cloudfront Domain'
    Value: !GetAtt MyDistribution.DomainName
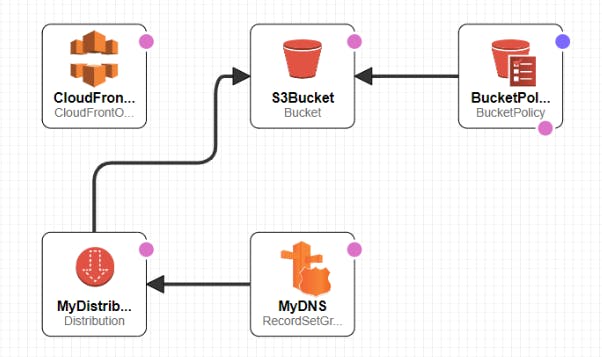
**2) Create AWS CodePipeline stack CloudFormation Templates: **
Through this **we create AWS CodePipeline stack to deploy above Application stack in CI/CD manner with Source as AWS CodeCommit and Deploy Action Provider as CloudFormation. **
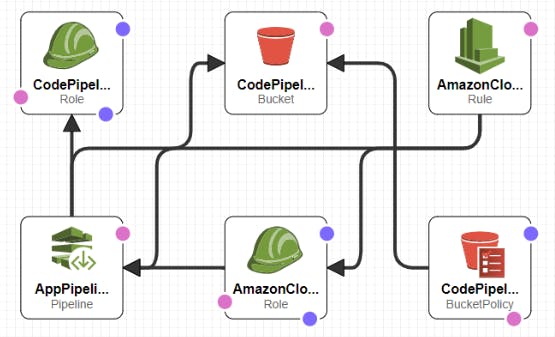
Here we create resources: S3 bucket for artifacts for CodePipeline + Bucket policies for the same, AWS CloudWatch Event rule(For CI/CD, To detect if any code changes done at the Source and then trigger the necessary action) + IAM Role for the CloudWatch Event, AWS CodePipeline defining the Source as AWS CodeCommit and Deploy Action Provider as CloudFormation, Roles for CodePipeline and CloudFormation
NOTE: I highly recommend to create the Pipeline using AWS Console first, so we get better idea on the necessary configurations and then proceed with CloudFormation templates.
Refer this link
Also refer samples @ **this link **
Parameters:
  BranchName:
    Description: CodeCommit branch name
    Type: String
    Default: master

  RepositoryName:
    Description: CodeCommit repository name
    Type: String
    Default: MyResumeWebsite_CFTemplates

  ProdStackName:
    Description: Application stack name
    Type: String
    Default: ResumePipelineCICD

  TemplateFileName:
    Description: CloudFormation Template name
    Type: String

  ParamConfigFileName:
    Description: Parameters Configuration filename with extension
    Type: String

Resources:
  CodePipelineArtifactStoreBucket:
    Type: 'AWS::S3::Bucket'

  CodePipelineArtifactStoreBucketPolicy:
    Type: 'AWS::S3::BucketPolicy'
    Properties:
      Bucket: !Ref CodePipelineArtifactStoreBucket
      PolicyDocument:
        Version: 2012-10-17
        Statement:
          - Sid: DenyUnEncryptedObjectUploads
            Effect: Deny
            Principal: '*'
            Action: 's3:PutObject'
            Resource: !Join
              - ''
              - - !GetAtt
                  - CodePipelineArtifactStoreBucket
                  - Arn
                - /*
            Condition:
              StringNotEquals:
                's3:x-amz-server-side-encryption': 'aws:kms'
          - Sid: DenyInsecureConnections
            Effect: Deny
            Principal: '*'
            Action: 's3:*'
            Resource: !Join
              - ''
              - - !GetAtt
                  - CodePipelineArtifactStoreBucket
                  - Arn
                - /*
            Condition:
              Bool:
                'aws:SecureTransport': false

  AmazonCloudWatchEventRole:
    Type: 'AWS::IAM::Role'
    Properties:
      AssumeRolePolicyDocument:
        Version: 2012-10-17
        Statement:
          - Effect: Allow
            Principal:
              Service:
                - events.amazonaws.com
            Action: 'sts:AssumeRole'
      Path: /
      Policies:
        - PolicyName: cwe-pipeline-execution
          PolicyDocument:
            Version: 2012-10-17
            Statement:
              - Effect: Allow
                Action: 'codepipeline:StartPipelineExecution'
                Resource: !Join
                  - ''
                  - - 'arn:aws:codepipeline:'
                    - !Ref 'AWS::Region'
                    - ':'
                    - !Ref 'AWS::AccountId'
                    - ':'
                    - !Ref AppPipeline

  AmazonCloudWatchEventRule:
    Type: 'AWS::Events::Rule'
    Properties:
      EventPattern:
        source:
          - aws.codecommit
        detail-type:
          - CodeCommit Repository State Change
        resources:
          - !Join
            - ''
            - - 'arn:aws:codecommit:'
              - !Ref 'AWS::Region'
              - ':'
              - !Ref 'AWS::AccountId'
              - ':'
              - !Ref RepositoryName
        detail:
          event:
            - referenceCreated
            - referenceUpdated
          referenceType:
            - branch
          referenceName:
            - master
      Targets:
        - Arn: !Join
            - ''
            - - 'arn:aws:codepipeline:'
              - !Ref 'AWS::Region'
              - ':'
              - !Ref 'AWS::AccountId'
              - ':'
              - !Ref AppPipeline
          RoleArn: !GetAtt
            - AmazonCloudWatchEventRole
            - Arn
          Id: codepipeline-AppPipeline

  AppPipeline:
    Type: 'AWS::CodePipeline::Pipeline'
    Properties:
      Name: codecommit-events-pipeline
      RoleArn: !GetAtt
        - CodePipelineServiceRole
        - Arn
      Stages:
        - Name: Source
          Actions:
            - Name: SourceAction
              ActionTypeId:
                Category: Source
                Owner: AWS
                Version: 1
                Provider: CodeCommit
              OutputArtifacts:
                - Name: SourceOutput
              Configuration:
                BranchName: !Ref BranchName
                RepositoryName: !Ref RepositoryName
                PollForSourceChanges: false
              RunOrder: 1
        - Name: Deploy
          Actions:
            - Name: DeployAction
              InputArtifacts:
                - Name: SourceOutput
              ActionTypeId:
                Category: Deploy
                Owner: AWS
                Version: 1
                Provider: CloudFormation
              Configuration:
                ActionMode: CREATE_UPDATE
                Capabilities: CAPABILITY_IAM
                RoleArn: !GetAtt [CFNRole, Arn]
                StackName: !Ref ProdStackName
                TemplatePath: !Sub "SourceOutput::${TemplateFileName}"
                TemplateConfiguration: !Sub "SourceOutput::${ParamConfigFileName}"
              RunOrder: 1
      ArtifactStore:
        Type: S3
        Location: !Ref CodePipelineArtifactStoreBucket

  CodePipelineServiceRole:
    Type: 'AWS::IAM::Role'
    Properties:
      AssumeRolePolicyDocument:
        Version: 2012-10-17
        Statement:
          - Effect: Allow
            Principal:
              Service:
                - codepipeline.amazonaws.com
            Action: 'sts:AssumeRole'
      Path: /
      Policies:
        - PolicyName: AWS-CodePipeline-Service-3
          PolicyDocument:
            Version: 2012-10-17
            Statement:
              - Effect: Allow
                Action:
                  - 'codecommit:CancelUploadArchive'
                  - 'codecommit:GetBranch'
                  - 'codecommit:GetCommit'
                  - 'codecommit:GetUploadArchiveStatus'
                  - 'codecommit:UploadArchive'
                Resource: '*'
              - Effect: Allow
                Action:
                  - 'codedeploy:CreateDeployment'
                  - 'codedeploy:GetApplicationRevision'
                  - 'codedeploy:GetDeployment'
                  - 'codedeploy:GetDeploymentConfig'
                  - 'codedeploy:RegisterApplicationRevision'
                Resource: '*'
              - Effect: Allow
                Action:
                  - 'codebuild:BatchGetBuilds'
                  - 'codebuild:StartBuild'
                Resource: '*'
              - Effect: Allow
                Action:
                  - 'iam:PassRole'
                Resource: '*'
              - Effect: Allow
                Action:
                  - 'cloudwatch:*'
                  - 's3:*'
                  - 'sns:*'
                  - 'cloudformation:*'
                Resource: '*'

  CFNRole:
    Type: 'AWS::IAM::Role'
    Properties:
      AssumeRolePolicyDocument:
        Version: 2012-10-17
        Statement:
          - Effect: Allow
            Principal:
              Service:
                - cloudformation.amazonaws.com
            Action: 'sts:AssumeRole'
      Path: /
      Policies:
        - PolicyName: AWS-CloudFormation-Access-Policy
          PolicyDocument:
            Version: 2012-10-17
            Statement:
            - Effect: Allow
              Action:
              - s3:*
              Resource: "*"
            - Action:
              - s3:ListAllMyBuckets
              Effect: Allow
              Resource: arn:aws:s3:::*
            - Action:
              - acm:ListCertificates
              - cloudfront:*
              - iam:ListServerCertificates
              Effect: Allow
              Resource: "*"
            - Action:
              - iam:ListRoles
              Effect: Allow
              Resource: arn:aws:iam::*:*
            - Effect: Allow
              Action:
              - route53:*
              - route53domains:*
              - cloudfront:ListDistributions
              - s3:ListBucket
              - s3:GetBucketLocation
              - s3:GetBucketWebsite
              - sns:ListTopics
              - sns:ListSubscriptionsByTopic
              - cloudwatch:DescribeAlarms
              - cloudwatch:GetMetricStatistics
              Resource: "*"
            - Effect: Allow
              Action: apigateway:GET
              Resource: arn:aws:apigateway:*::/domainnames
            - Effect: Allow
              Action:
              - acm:*
              Resource: "*"
            - Effect: Allow
              Action: iam:CreateServiceLinkedRole
              Resource: arn:aws:iam::*:role/aws-service-role/acm.amazonaws.com/AWSServiceRoleForCertificateManager*
              Condition:
                StringEquals:
                  iam:AWSServiceName: acm.amazonaws.com
            - Effect: Allow
              Action:
              - iam:DeleteServiceLinkedRole
              - iam:GetServiceLinkedRoleDeletionStatus
              - iam:GetRole
              Resource: arn:aws:iam::*:role/aws-service-role/acm.amazonaws.com/AWSServiceRoleForCertificateManager*
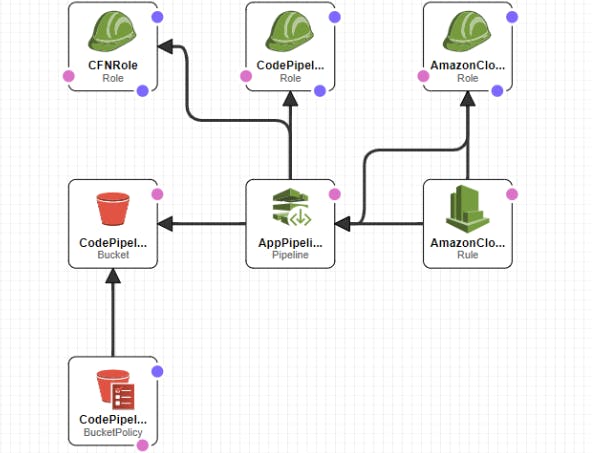
**3) To deploy the CodePipeline stack as well as Application stack through AWS CLI: ** Once the CloudFormation templates are ready for CodePipeline and Application stack, deploy using below commands
aws configure

aws cloudformation deploy --template-file CodePipeline_ResumeWebsite_WithConfigParams.yml --stack-name MyResumeStaticWebsite --parameter-overrides TemplateFileName=S3-StaticWebsite-WithCDN-WithOAI-WithCustomCertificate.yml ParamConfigFileName=CF_Template_configuration_ResumeWebsite.json --capabilities=CAPABILITY_IAM

**In above example: ** CodePipeline template = CodePipeline_ResumeWebsite_WithConfigParams.yml, Application stack template = S3-StaticWebsite-WithCDN-WithOAI-WithCustomCertificate.yml, Parameter config file for Application stack = CF_Template_configuration_ResumeWebsite.json
Parameter overriding
If we need to override parameters of the Parent stack(in this case CodePipeline stack), we can use --parameter-overrides and provide the parameters.
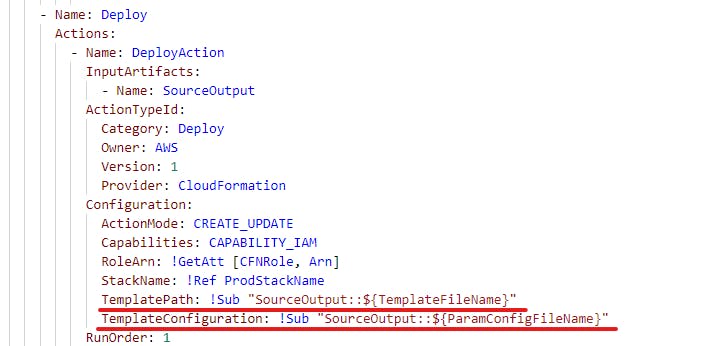
But in case if you need to override the parameters of the Child stack(in this case Application stack), you can provide the parameters in the config file as below

Following is the content of CF_Template_configuration_ResumeWebsite.json
{
  "Parameters" : {
    "ACMCertARN" : "arn:aws:acm:us-east-1:467069435281:certificate/03127741-610e-4062-95c2-450b614918de",
    "RootDomainName" : "stareventhorizon.com",
    "CDNAltDomainName" : "myresume.stareventhorizon.com",
    "CDNHostedZoneID" : "Z2FDTNDATAQYW2",
    "S3BucketName" : "myresumestaticwebsite"
  }
}
Below is the snippet of how CodePipeline stack(CodePipeline_ResumeWebsite_WithConfigParams.yml) passes the parameters from the json config file to the Application stack
Now once the Pipeline is setup, next time onwards whenever code changes happen in the AWS CodeCommit repo, AWS CodePipeline would be triggered which will deploy the updated Application CloudFormation stack resources
3B) Stack2 - Create Serverless application stack consisting of API Gateway, Lambda, DynamoDB
Like earlier stack its a 2 step process:
Create the Application stack CloudFormation template(template.yaml)
For deploying the Application stack, create the SAM Pipeline stack using below options a) GitHub Actions b) AWS CodePipeline
For SAM Pipeline Creation and Deployment, referthis link
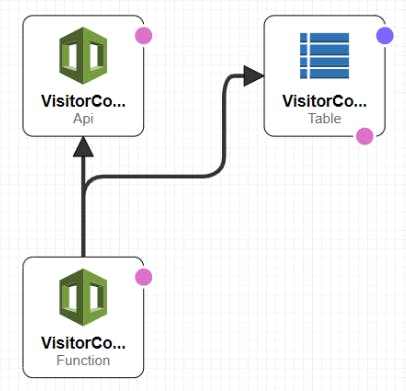
Now once the Pipeline is setup, next time onwards whenever code changes happen in the GitHub / AWS CodeCommit repo, SAM Pipeline would be triggered which will deploy the updated Application CloudFormation stack resources
3C) Stack3 - Create Application stack consisting of S3 bucket
1) Create AWS CodePipeline stack CloudFormation Templates
Through this we create AWS CodePipeline stack with Source as AWS CodeCommit and Deploy Action Provider as S3 bucket.
So whenever new files(html,css,javascript,images,etc) related to the static website are checked into AWS CodeCommit, Pipeline will be triggered which will push those new files on to the S3 bucket.
Here we create resources: S3 bucket for artifacts for CodePipeline + Bucket policies for the same, AWS CloudWatch Event rule(For CI/CD, To detect if any code changes done at the Source and then trigger the necessary action) + IAM Role for the CloudWatch Event, AWS CodePipeline defining the Source as AWS CodeCommit and Deploy Action Provider as S3 bucket, Roles for CodePipeline.
NOTE: Refer samples @this link
Parameters:
  BranchName:
    Description: CodeCommit branch name
    Type: String
    Default: master

  RepositoryName:
    Description: CodeCommit repository name
    Type: String
    Default: Resume-Pipeline-ForS3

  S3ResumeStaticWebsite:
    Description: Application stack name
    Type: String

Resources:
  CodePipelineArtifactStoreBucket:
    Type: 'AWS::S3::Bucket'

  CodePipelineArtifactStoreBucketPolicy:
    Type: 'AWS::S3::BucketPolicy'
    Properties:
      Bucket: !Ref CodePipelineArtifactStoreBucket
      PolicyDocument:
        Version: 2012-10-17
        Statement:
          - Sid: DenyUnEncryptedObjectUploads
            Effect: Deny
            Principal: '*'
            Action: 's3:PutObject'
            Resource: !Join
              - ''
              - - !GetAtt
                  - CodePipelineArtifactStoreBucket
                  - Arn
                - /*
            Condition:
              StringNotEquals:
                's3:x-amz-server-side-encryption': 'aws:kms'
          - Sid: DenyInsecureConnections
            Effect: Deny
            Principal: '*'
            Action: 's3:*'
            Resource: !Join
              - ''
              - - !GetAtt
                  - CodePipelineArtifactStoreBucket
                  - Arn
                - /*
            Condition:
              Bool:
                'aws:SecureTransport': false

  AmazonCloudWatchEventRole:
    Type: 'AWS::IAM::Role'
    Properties:
      AssumeRolePolicyDocument:
        Version: 2012-10-17
        Statement:
          - Effect: Allow
            Principal:
              Service:
                - events.amazonaws.com
            Action: 'sts:AssumeRole'
      Path: /
      Policies:
        - PolicyName: cwe-pipeline-execution
          PolicyDocument:
            Version: 2012-10-17
            Statement:
              - Effect: Allow
                Action: 'codepipeline:StartPipelineExecution'
                Resource: !Join
                  - ''
                  - - 'arn:aws:codepipeline:'
                    - !Ref 'AWS::Region'
                    - ':'
                    - !Ref 'AWS::AccountId'
                    - ':'
                    - !Ref AppPipeline

  AmazonCloudWatchEventRule:
    Type: 'AWS::Events::Rule'
    Properties:
      EventPattern:
        source:
          - aws.codecommit
        detail-type:
          - CodeCommit Repository State Change
        resources:
          - !Join
            - ''
            - - 'arn:aws:codecommit:'
              - !Ref 'AWS::Region'
              - ':'
              - !Ref 'AWS::AccountId'
              - ':'
              - !Ref RepositoryName
        detail:
          event:
            - referenceCreated
            - referenceUpdated
          referenceType:
            - branch
          referenceName:
            - master
      Targets:
        - Arn: !Join
            - ''
            - - 'arn:aws:codepipeline:'
              - !Ref 'AWS::Region'
              - ':'
              - !Ref 'AWS::AccountId'
              - ':'
              - !Ref AppPipeline
          RoleArn: !GetAtt
            - AmazonCloudWatchEventRole
            - Arn
          Id: codepipeline-AppPipeline

  AppPipeline:
    Type: 'AWS::CodePipeline::Pipeline'
    Properties:
      Name: codecommit-events-pipeline-for-s3
      RoleArn: !GetAtt
        - CodePipelineServiceRole
        - Arn
      Stages:
        - Name: Source
          Actions:
            - Name: SourceAction
              ActionTypeId:
                Category: Source
                Owner: AWS
                Version: 1
                Provider: CodeCommit
              OutputArtifacts:
                - Name: SourceOutput
              Configuration:
                BranchName: !Ref BranchName
                RepositoryName: !Ref RepositoryName
                PollForSourceChanges: false
              RunOrder: 1
        - Name: Deploy
          Actions:
            - Name: DeployAction
              InputArtifacts:
                - Name: SourceOutput
              ActionTypeId:
                Category: Deploy
                Owner: AWS
                Version: 1
                Provider: S3
              Configuration:
                BucketName: !Ref S3ResumeStaticWebsite
                Extract: 'true'
              RunOrder: 1
      ArtifactStore:
        Type: S3
        Location: !Ref CodePipelineArtifactStoreBucket

  CodePipelineServiceRole:
    Type: 'AWS::IAM::Role'
    Properties:
      AssumeRolePolicyDocument:
        Version: 2012-10-17
        Statement:
          - Effect: Allow
            Principal:
              Service:
                - codepipeline.amazonaws.com
            Action: 'sts:AssumeRole'
      Path: /
      Policies:
        - PolicyName: AWS-CodePipeline-Service-3
          PolicyDocument:
            Version: 2012-10-17
            Statement:
              - Effect: Allow
                Action:
                  - 'codecommit:CancelUploadArchive'
                  - 'codecommit:GetBranch'
                  - 'codecommit:GetCommit'
                  - 'codecommit:GetUploadArchiveStatus'
                  - 'codecommit:UploadArchive'
                Resource: '*'
              - Effect: Allow
                Action:
                  - 'codedeploy:CreateDeployment'
                  - 'codedeploy:GetApplicationRevision'
                  - 'codedeploy:GetDeployment'
                  - 'codedeploy:GetDeploymentConfig'
                  - 'codedeploy:RegisterApplicationRevision'
                Resource: '*'
              - Effect: Allow
                Action:
                  - 'codebuild:BatchGetBuilds'
                  - 'codebuild:StartBuild'
                Resource: '*'
              - Effect: Allow
                Action:
                  - 'lambda:InvokeFunction'
                  - 'lambda:ListFunctions'
                Resource: '*'
              - Effect: Allow
                Action:
                  - 'iam:PassRole'
                Resource: '*'
              - Effect: Allow
                Action:
                  - 'cloudwatch:*'
                  - 's3:*'
                  - 'cloudformation:*'
                Resource: '*'
**2) To deploy the CodePipeline stack through AWS CLI: ** Once the CloudFormation templates are ready for CodePipeline, deploy using below commands
aws cloudformation deploy --template-file CodePipeline_ResumeWebsite_S3Data.yml --stack-name MyResumeStaticWebsiteForS3 --parameter-overrides RepositoryName=MyResumeWebsite_CFTemplates-ForS3 S3ResumeStaticWebsite=myresumestaticwebsite --capabilities=CAPABILITY_IAM

In above example: CodePipeline template = CodePipeline_ResumeWebsite_S3Data.yml, and here directly the parameters are passed to the Parent stack(CodePipeline)
**eg. --parameter-overrides RepositoryName=MyResumeWebsite_CFTemplates-ForS3 S3ResumeStaticWebsite=myresumestaticwebsite **
Now once the Pipeline is setup, next time onwards whenever file changes happen in the AWS CodeCommit repo, AWS CodePipeline would be triggered which will push the files onto the S3 bucket
4) Displaying the VisitorCount on the WebPage
Here the ask is any time any user visits the Website, it should display the current Visitor Count.
So whenever any user visits the Website, Javascript from the Web Front End(HTML Code) sends request to "API Gateway" API. API Gateway then proxies the request to Lambda function.
Lambda then retrieves the current Count from DynamoDB Table and makes relevant updation and sends it back to API Gateway.
Below is the Lambda function snippet
import json
import os
import boto3
from boto3.dynamodb.conditions import Key

dynamodb = boto3.resource('dynamodb')
TableName_EV = os.environ['DynamoDBTableName']
TableName = dynamodb.Table(TableName_EV)

def lambda_handler(event, context):

    print('Lambda Handler Begins Here')

    #Get items having "Label=VISITOR_COUNTER"
    try:
        response = TableName.query(KeyConditionExpression=Key('Label').eq('VISITOR_COUNTER'))
    except Exception as E:
        print('Sorry. Something went wrong, unable to Query from DB')
        print(E)
        err_resp = {"body": "Sorry. Something went wrong"}
        return err_resp

    #print(response["Items"])

    #When first Request is made
    if len(response["Items"]) == 0:
        try:
            resp1 = TableName.put_item(Item={'Label': "VISITOR_COUNTER",'Counter': "1"})

            return {
                    "statusCode": 200,
                    "headers": {
                        'Access-Control-Allow-Headers': '*',
                        'Access-Control-Allow-Origin': '*',
                        'Access-Control-Allow-Methods': '*',
                        'Content-Type': 'application/json'
                    },
                    "body": json.dumps(
                    {
                        "VisitorCount": 1
                    }
                    )
            }

        except Exception as E:
            print('Sorry. Something went wrong, unable to write first item into DB')
            print(E)
            err_resp = {"body": "Sorry. Something went wrong"}
            return err_resp
    else:
        #Second subsequent requests
        try:
            resp2 = TableName.get_item(Key={'Label': "VISITOR_COUNTER"})
        except Exception as E:
            print('Sorry. Something went wrong, unable to read item from DB')
            print(E)
            err_resp = {"body": "Sorry. Something went wrong"}
            return err_resp


        key_list = list(resp2['Item'].keys())
        val_list = list(resp2['Item'].values())

        position = key_list.index('Counter')
        #print(val_list[position])

        inter_count = int(val_list[position]) + 1
        #print(inter_count)

        try:
            resp3 = TableName.put_item(Item={'Label': "VISITOR_COUNTER", 'Counter':inter_count})
        except Exception as E:
            print('Sorry. Something went wrong, unable to write item into DB')
            print(E)
            err_resp = {"body": "Sorry. Something went wrong"}
            return err_resp


        print('Lambda Handler Ends')

        return {
                "statusCode": 200,
                "headers": {
                    'Access-Control-Allow-Headers': '*',
                    'Access-Control-Allow-Origin': '*',
                    'Access-Control-Allow-Methods': '*',
                    'Content-Type': 'application/json'
                },
                "body": json.dumps(
                {
                    "VisitorCount": inter_count
                }
                )
            }
In the Javascript, by applying fetch function on the API the Website Visitor Count is retrieved and displayed on the WebPage.
Following the JS code snippet to fetch Visitor Count from the API
        <div class="row">
          <div class="col-sm-12 text-center">
            <div id="myData"></div>
            <script>
                      fetch('https://visitorcountapi.stareventhorizon.com/Prod/visitorcount')
                    .then(function (response) {
                        return response.json();
                    })
                    .then(function (data) {
                        appendData(data);
                    })
                    .catch(function (err) {
                        console.log('error: ' + err);
                    });
                    function appendData(data) {
                        var mainContainer = document.getElementById("myData");
                        var div = document.createElement("div");
                        div.innerHTML = "<span style='color: #595959;'>Visitor Count: </span>" + data.VisitorCount;
                           mainContainer.appendChild(div);
                    }
            </script>
            </div>
          </div>
        </div>
5) Designing the Website using HTML, CSS, Javascript
There are plenty of free downloadable Website Templates available Online. I made use of one such template and modified it as per my requirement.
My Reference Links
a) The entire application code base discussed above is available under my GitHub Repo at link
b) For my Website link Click here
Conclusion
This being my first AWS Personal Project, configuring the entire Application as "Infrastructure as Code" and deploying the same using "CI/CD Pipeline" has helped me immensely to make my foundation of these concepts more stronger.
The bonus was involving in RND, Implementation, Troubleshooting was super fun.
I hope this article helps in your implementation of CI/CD Pipeline through Infrastructure as Code.